
How to Create a Channel
Updated
Within the Sardius Control Panel, a Channel is where you create dynamic watch pages to display a player, control your schedule, build a library of on-demand videos, and so much more. Channels are the heart of your Control Panel and the backbone of your viewers' experience.
The channel setup guide walks you through everything in six short steps. Almost every choice can be changed later in Channel Settings. The only exception is your channel URL.
Getting started
- Log in to your Sardius Control Panel at https://cp.sardius.media.
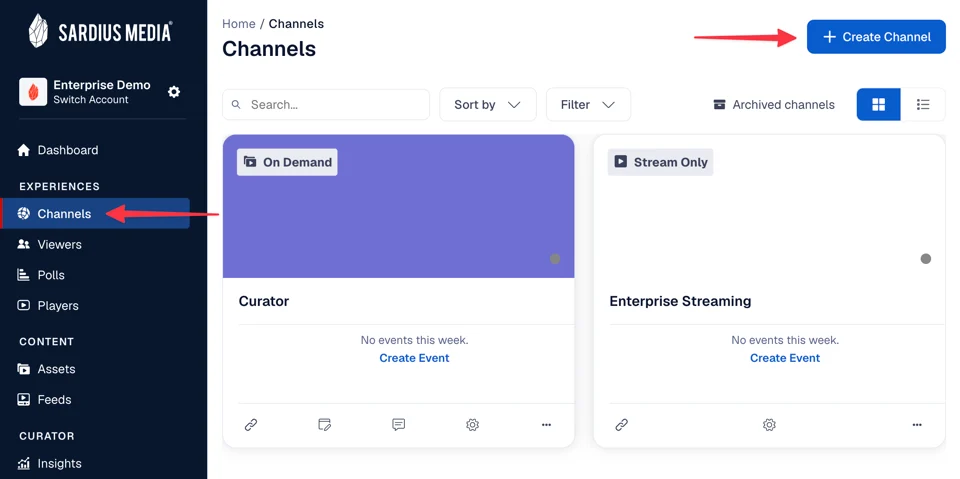
- Click Channels in the sidebar under Experiences.
- Click Create Channel in the top right.
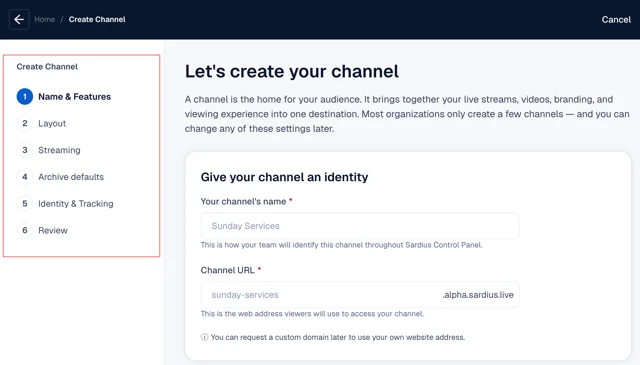
The setup guide opens with your progress listed on the left:
- Name & Features
- Layout
- Streaming
- Archive defaults
- Identity & Tracking
- Review
The steps you see depend on the features you choose in Step 1. For example, Streaming and Archive defaults only appear if your channel includes live streaming.
Step 1: Name & Features
This step names your channel, sets its web address, and tells the setup guide which features you'll use.
Give your channel an identity
• Your channel's name (required): How your team will identify this channel throughout the Control Panel.
• Channel URL (required): The web address viewers use to reach your channel (for example, sunday-mornings.sardius.live). It fills in automatically from your channel name.
If the URL is already in use:
Because the URL is built from your channel name, a name that matches an existing channel will also produce a URL that's already taken. You won't be able to continue until the URL is one that hasn't been used before. If needed, you can manually edit the URL field to something unique.
Customize your channel card
Your channel card is the tile your team sees on the Channels page. It's internal only, can be changed anytime, and doesn't affect your public website.
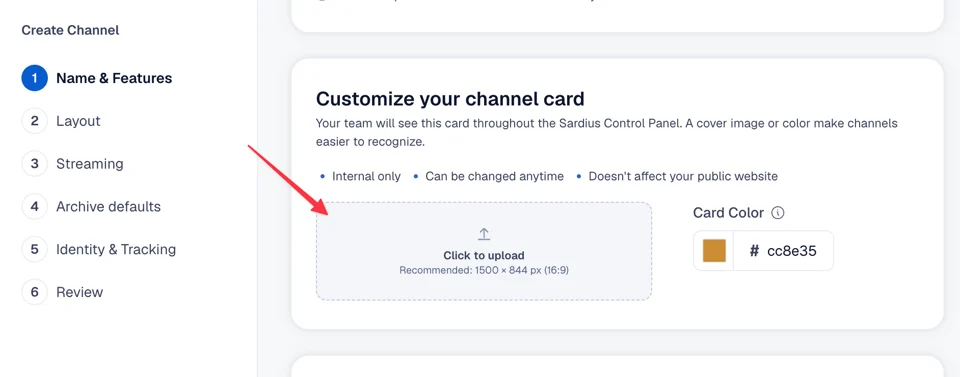
• Click to upload to add an image. Recommended size: 1500 × 844 px / 16: 9.
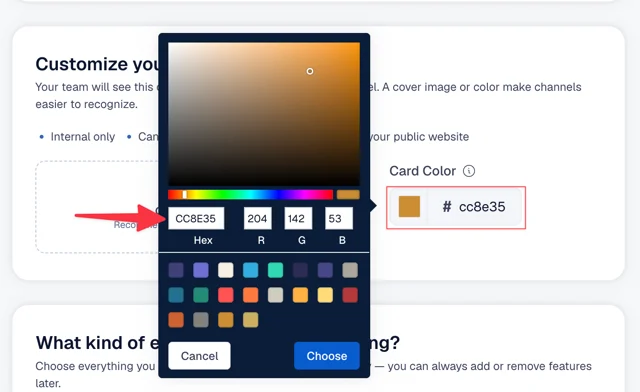
• For Card Color: Click the color swatch to open the color picker. Pick a shade on the color field, choose one of the preset colors, or type in a Hex code, then click Choose. The color shows on the card when there's no image.
Learn more in Channel Card Overview.
What kind of experience are you creating?
Select every feature you expect your audience to use (scroll to view all options). You can add or remove features later.
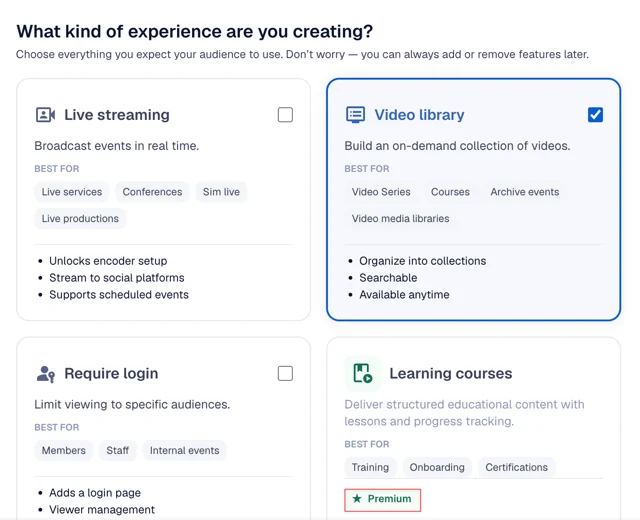
• Live streaming: Broadcast events in real time. Unlocks encoder setup, streaming to social platforms, and scheduled events.
• Video library: Build an on-demand collection of videos that's organized, searchable and available anytime.
• Require login: Limit viewing to specific audiences. Adds a login page, viewer management and audience segmentation.
• Learning courses: Deliver structured educational content with lessons and progress tracking.
• TV & mobile apps: Bring your channel to Apple TV, Roku, Fire TV and mobile apps.
• Ticketing & Registration: Manage event registration before viewers join your events.
Your selections here shape the next steps. For example, Live streaming adds the encoder and output setup, and Require login adds a login page and viewer segment step.
Step 2: Layout
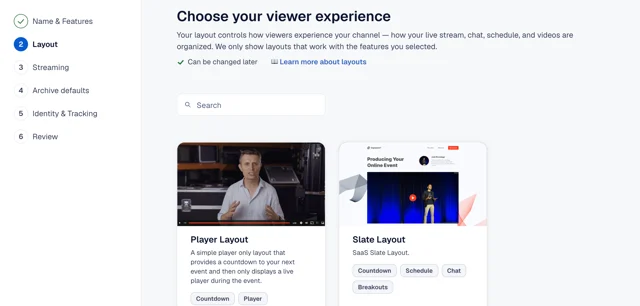
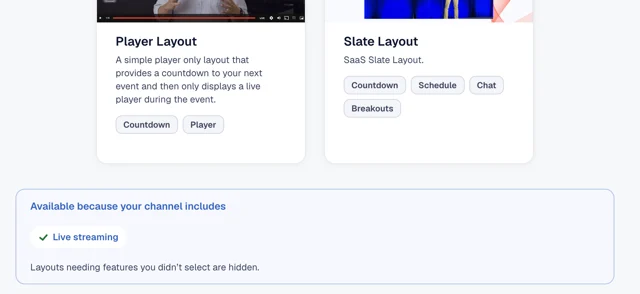
Your layout controls how viewers experience your channel, including how your live stream, chat, schedule and videos are organized. The setup guide only shows layouts that work with the features you selected in Step 1, and you can change your layout later if needed.
Choose a layout
-
Browse the layout cards, or type in the Search bar to filter them. Each card shows a short description, and lists the features the layout includes (such as Chat, Video On Demand or Speakers).
-
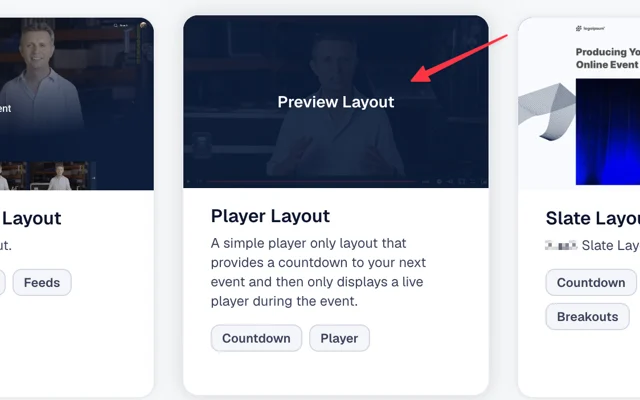
Hover over a card's image and click Preview Layout to see a larger example.
-
The preview shows what the layout Includes and which features it Works with (for example, Live streaming and Video library).
-
Click Use this layout in the preview to select it.
-
Click Continue. The button stays inactive until you select a layout.
To learn more about each layout type, see the Channels & Events section of the Knowledge Base:
Step 3: Streaming
Shown when Live streaming is selected in Step 1.
This step puts your live streaming pieces together: where your video comes from, where it's sent, and any extra places you'd like to stream to. These settings become your channel's default stream settings. You can override them for any individual event.
Click Add Source to begin. The setup opens in a pop-up window and only asks for the details your source needs.
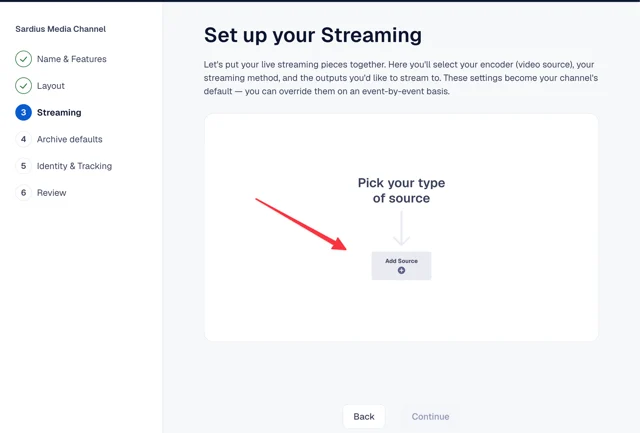
How is your stream coming in?
Your source is where your video comes from before it reaches Sardius. Choose one:
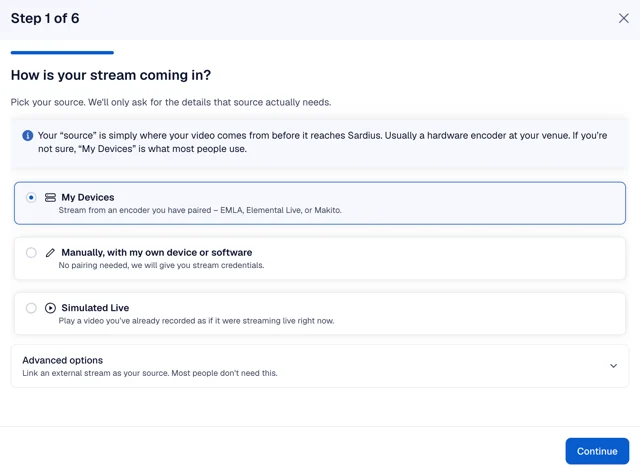
-
My Devices
Streaming from an encoder you've paired with Sardius (EMLA, Elemental Live or Makito). This is what most people use. See Add a Device for more information -
Manually, with my own device or software
Encoders or software that aren't paired with Sardius. No pairing needed: Sardius gives you stream credentials.
Learn more in Manual Sardius Stream Set Up -
Simulated Live
Playing a video you've already recorded as if it were streaming live. See Setting Up SimLive for more.
Using an external stream as your source? This is found under Advanced options.
For more information: Set Up Linked Asset (External Stream)
If you chose My Devices
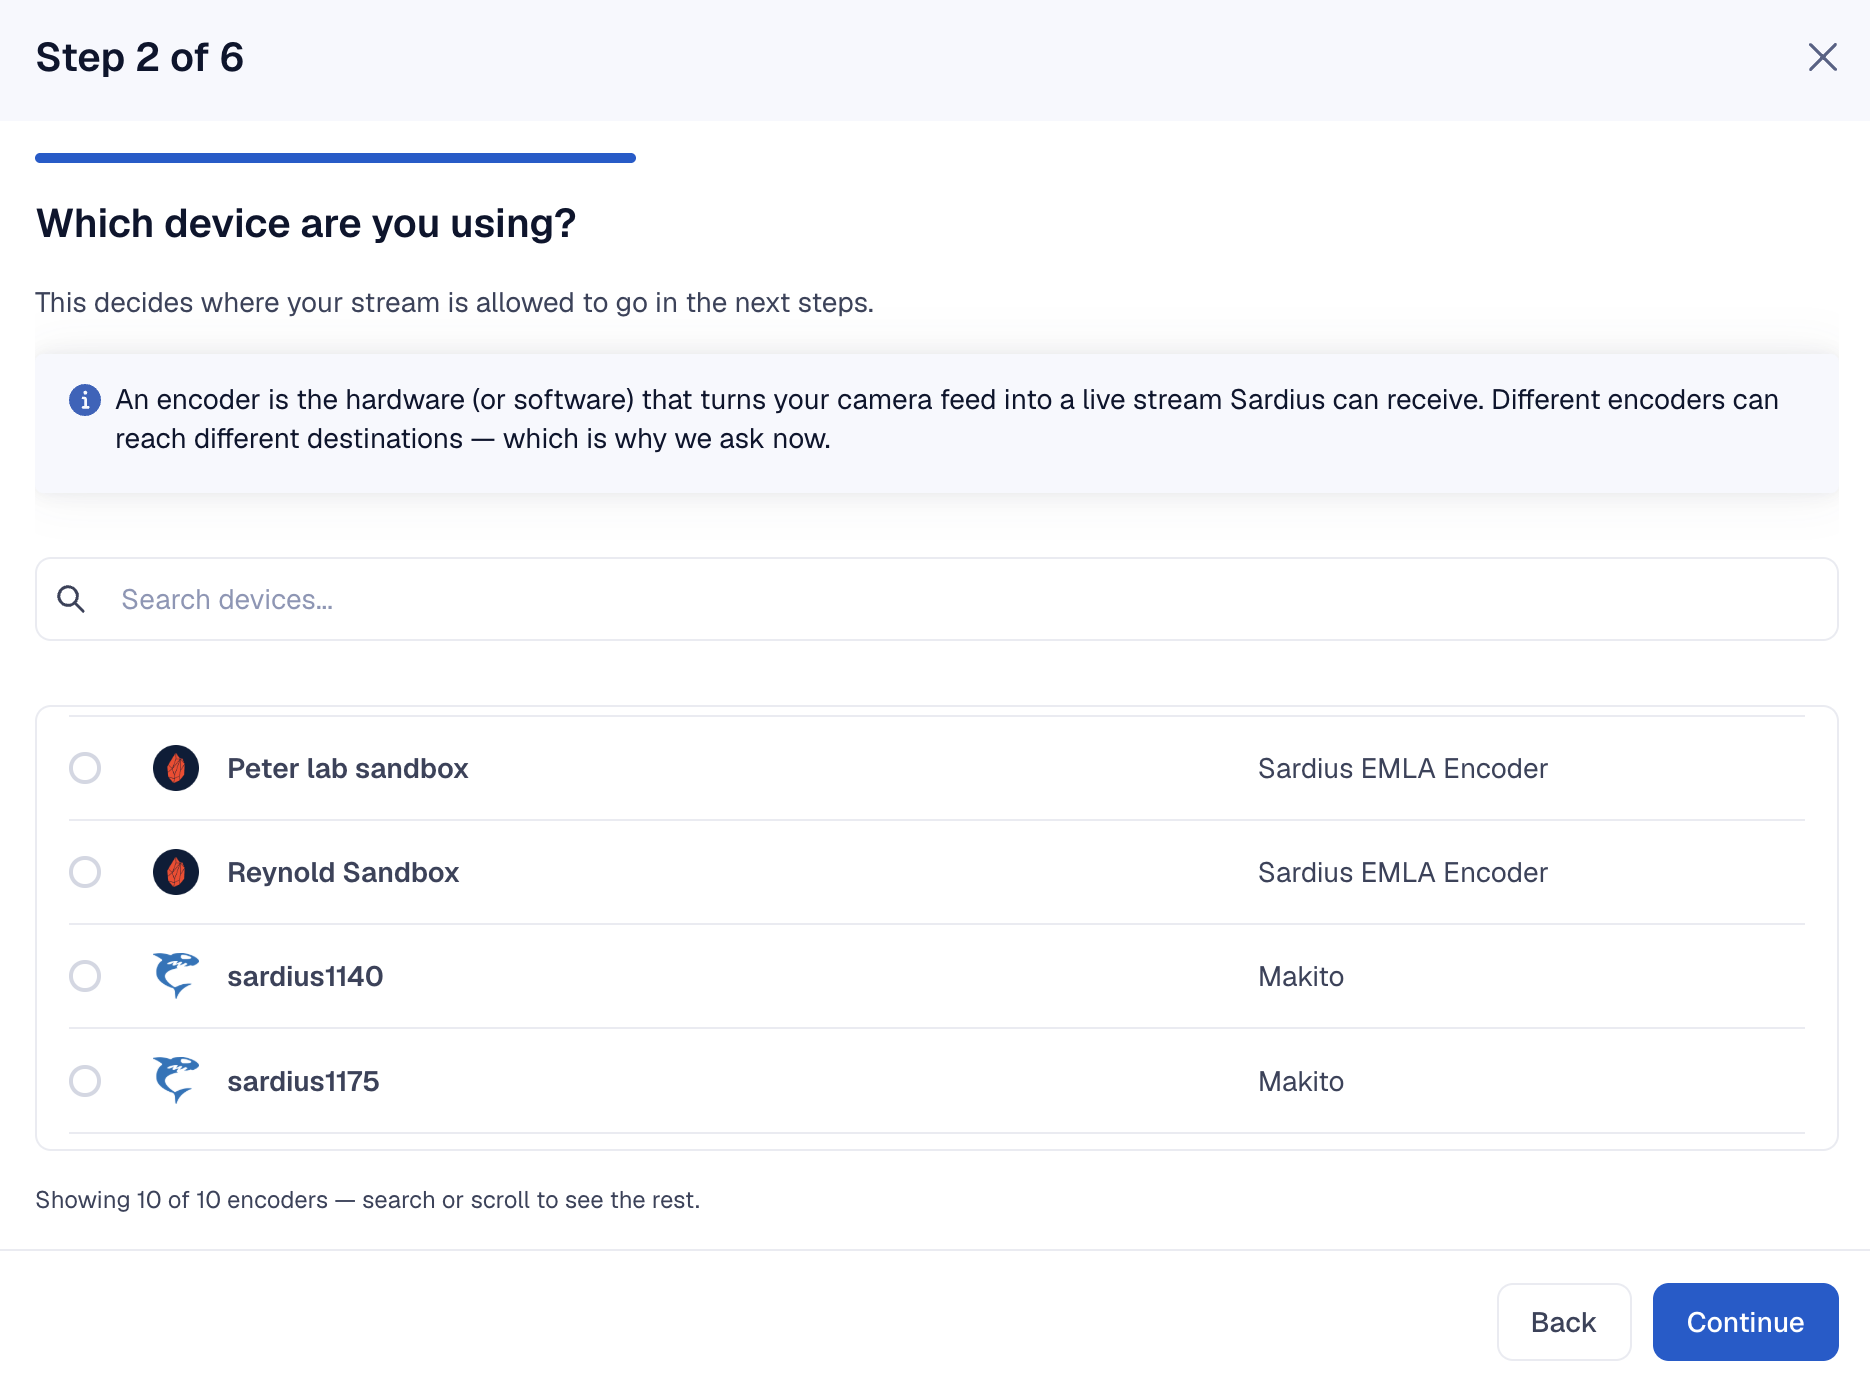
- Which device are you using? Select your encoder from the list, or search for it. Different encoders can reach different destinations, which is why this comes first.
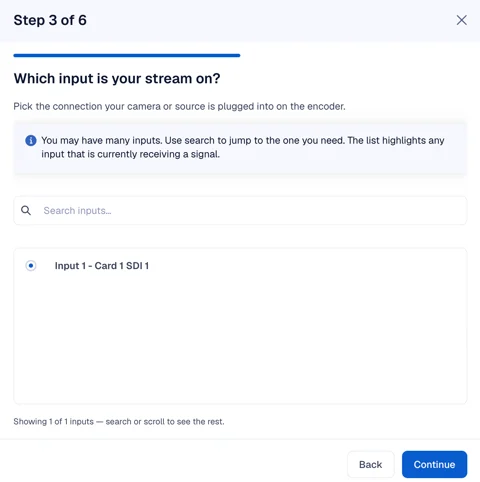
- Which input is your stream on? Pick the connection your camera or source is plugged into on the encoder. Any input currently receiving a signal is highlighted.
-
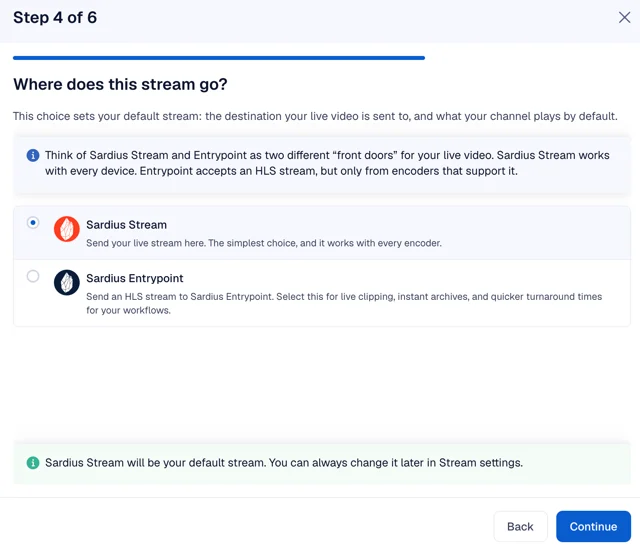
Where does this stream go? Choose your default stream:
◦ Sardius Stream (selected by default): the simplest choice, and it works with every encoder.◦ Sardius Entrypoint: sends an HLS stream to Sardius Entrypoint. Choose this for live clipping, instant archives and faster turnaround. Only available with encoders that support HLS.
See Sardius Stream, or Set Up Sardius HLS Entrypoint for more
- Choose a quality template. Your template sets your stream's resolution and bitrate. Only templates for your chosen destination are shown. If you're unsure, start with the recommended (pre-selected) template.
Learn more in Understanding Templates.
- Send your stream anywhere else? (Optional) This is where you add any outputs you'd also like to stream to, such as Facebook or YouTube. Use the search bar or the tabs (All, SRT, YouTube, Facebook, RTMP) to find them. Only outputs already set up in your account appear here.
See Adding an Output, or Using Outputs with Sardius HLS Entrypoint for more.
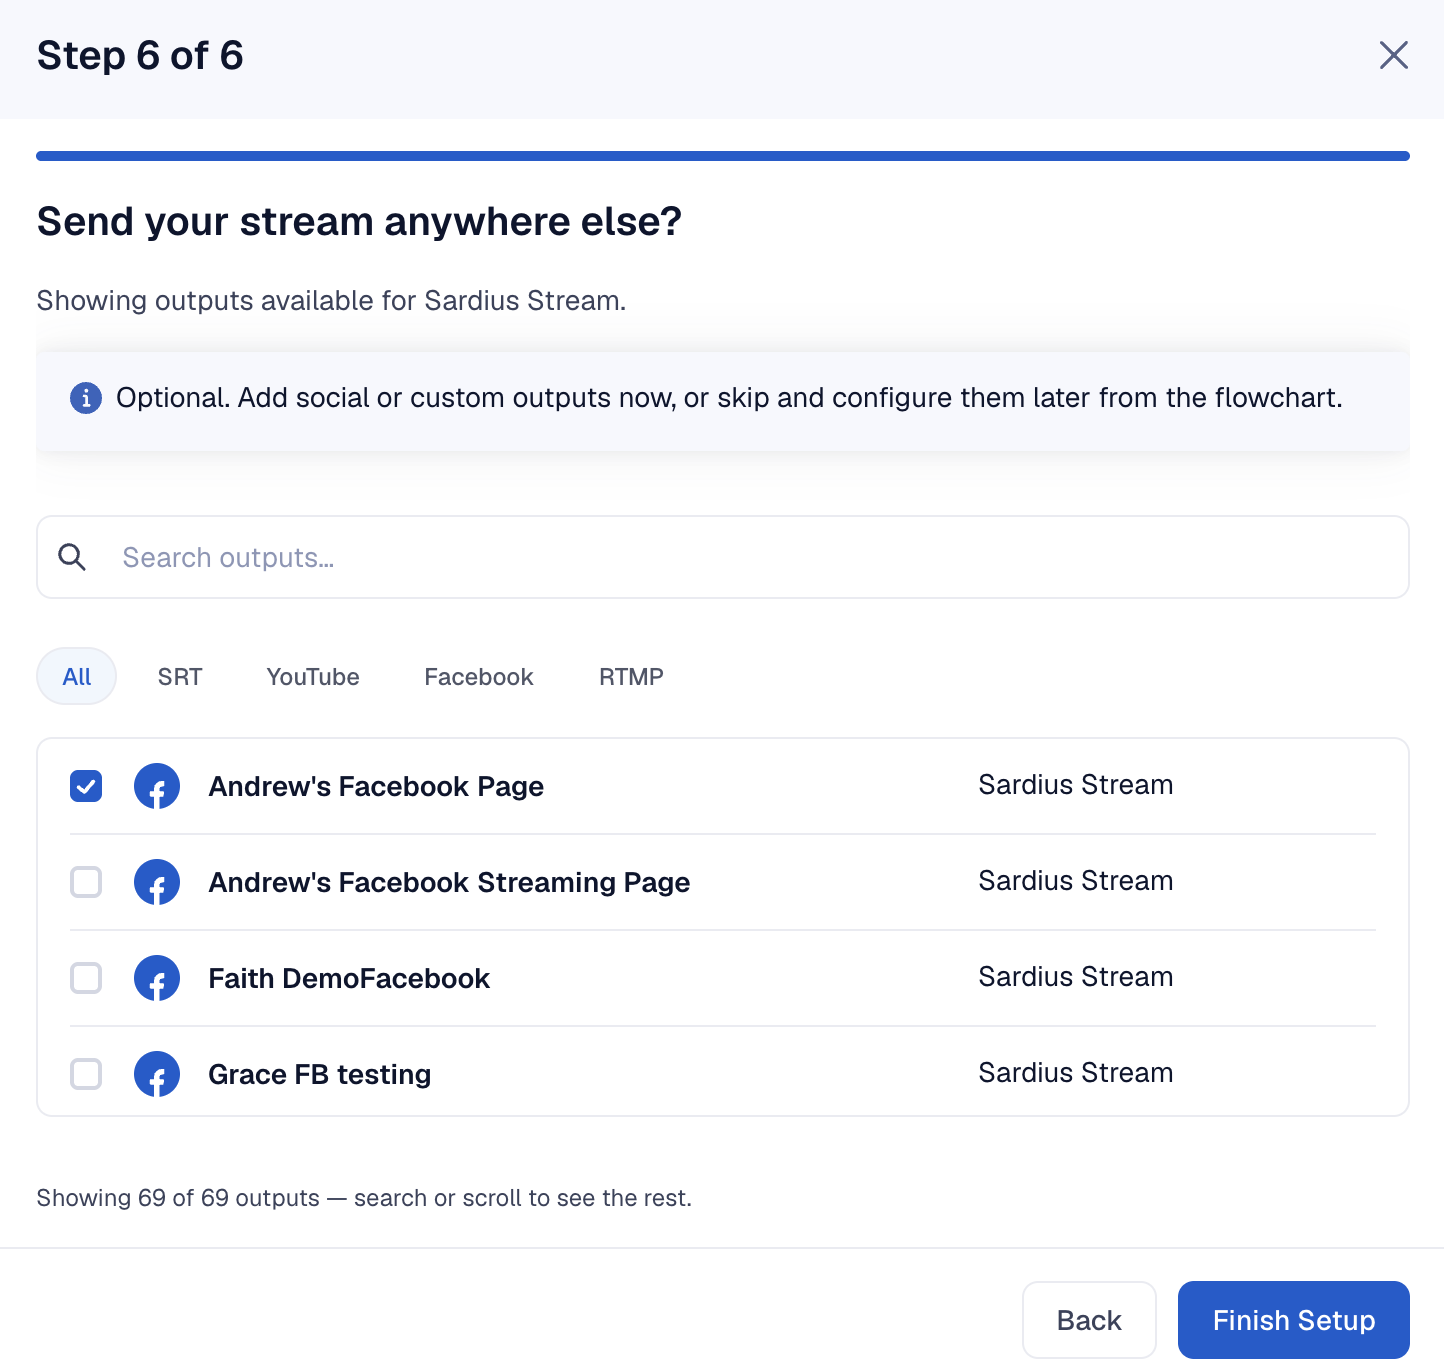
- To finish, click Finish setup or Skip and Finish Setup if you didn't select any outputs. You can always add outputs later.
If you chose Manually, with my own device or software
- Pick your protocol: RTMP, RTMPS, SRT or HLS. Choose the one your encoder or software supports.
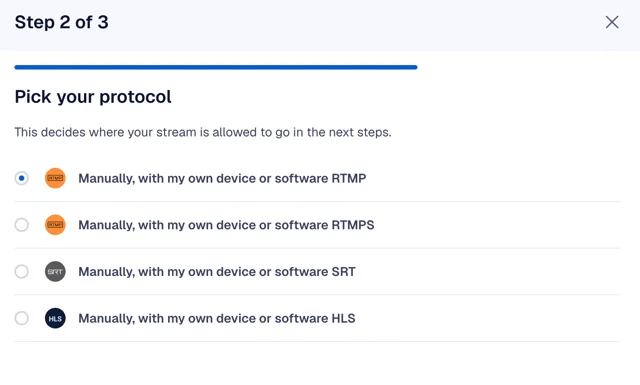
- Click Finish. Your stream credentials will be available in your channel's stream settings.
If you chose Simulated Live
- Select the type of media:
◦ Feed: a group of assets.
◦ Asset: a single video file.
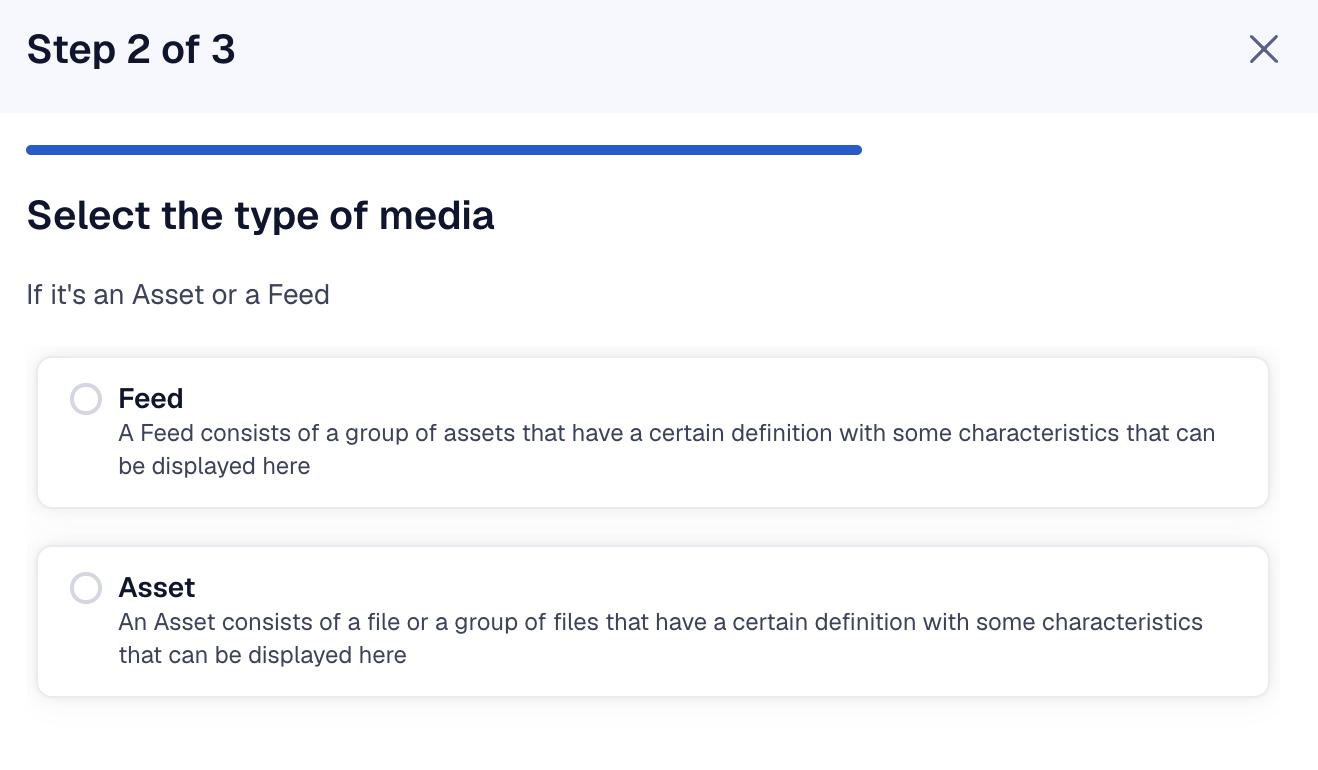
- Connect the media. Search by title or sort the list, then select the feed or asset to play.
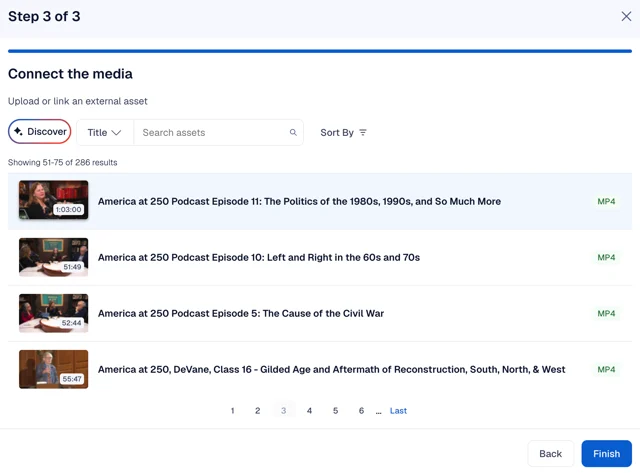
- Click Finish.
Learn more in Setting Up SimLive
If you chose Linked Asset (External Stream)
- Connect the media - Search for and select the linked asset.
- Click Finish.
Review your streaming setup
After you click Finish, your setup appears as a flowchart: your source, your default stream (marked with a star), and any outputs.
• Edit default settings: reopens the setup so you can make changes.
• Remove default settings: clears the setup. You'll need to add a source again before you can continue.
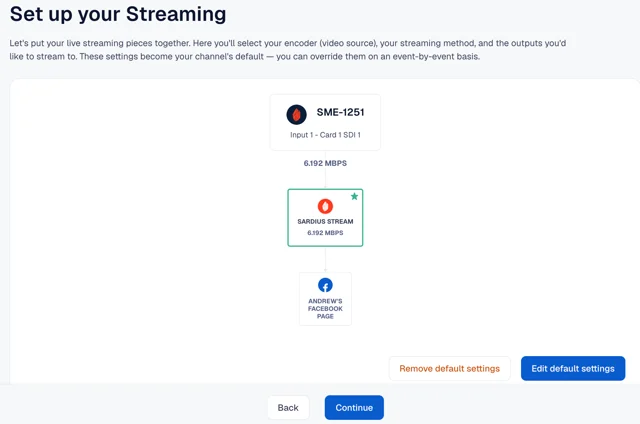
Click Continue to move on. You can adjust your stream settings anytime after your channel is created,
See Setup and Change Default Stream Settings for more.
Step 4: Archive defaults
Shown when Live streaming is selected in Step 1.
Archive defaults decide what happens to the recording after each live event. Everything starts turned off by default. Turn on Auto-archive to unlock the other settings.
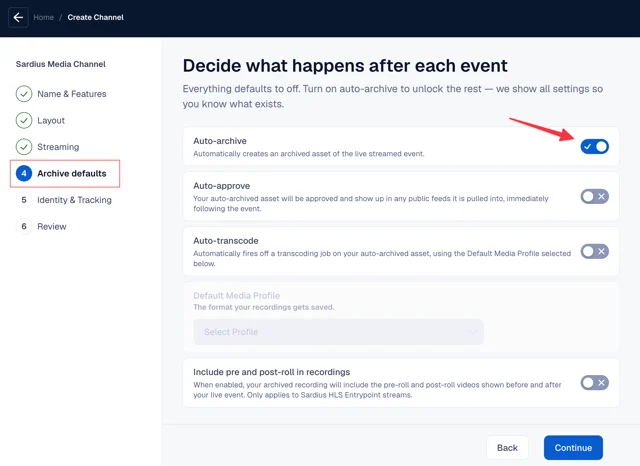
| Setting | What it does |
|---|---|
| Auto-archive | Automatically creates an archived asset of your live-streamed event. |
| Auto-approve | Approves the archived asset right after the event, so it shows up immediately in any public feeds it's pulled into. |
| Auto-transcode | Automatically starts a transcoding job on the archived asset, using the Default Media Profile below. |
| Default Media Profile | The format your recording is saved in. Available once Auto-transcode is on. |
| Include pre and post-roll in recordings | Adds the pre-roll and post-roll videos shown before and after your event to the archived recording. Only applies to Sardius HLS Entrypoint streams. |
| How long do we keep recordings? | • Keep forever (default): Recordings stay until you delete them. • Auto-delete after __ days: Recordings are deleted automatically after the number of days you enter (30 by default). |
| Metadata (Advanced) | Expand Metadata to add details to every archived recording automatically. This saves you from tagging each recording by hand. |
Click Continue when you're done.
Learn more in:
Step 5: Identity & Tracking (optional)
This step controls what people see when your channel link is shared or opened in a browser tab, and how you track visits.
It's optional: click Skip This Step and add it anytime later in Channel Settings if needed.
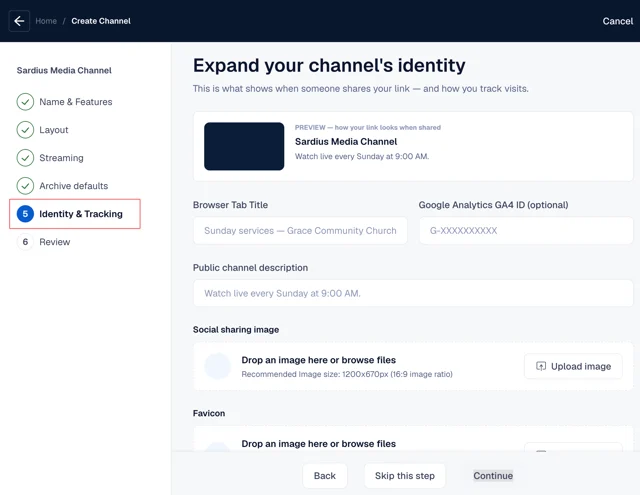
Preview: The box at the top shows how your link will look when it's shared. It updates as you fill in the fields below.
| Field | What it does |
|---|---|
| Browser Tab Title | The name shown in the browser tab and as the title of shared links. |
| Google Analytics GA4 ID (optional) | Your GA4 Measurement ID (starts with G-), so you can track channel visits in Google Analytics. |
| Public channel description | The short summary shown under the title when your link is shared (for example, "Watch live every Sunday at 9:00 AM."). |
| Social sharing image | The image shown when your link is posted on social media or in messages. Recommended size: 1200 × 670px. |
| Favicon | The small icon in browser tabs and on some mobile devices. A square (1 : 1) image works best. |
| Custom head content (HTML) (Advanced) | Adds analytics scripts, tracking pixels or other custom code to your channel page. Only use this if Sardius or your development team instructs you to. |
Why two images?
The card image from Step 1 only appears on your Channels page in the Control Panel.
The social sharing image here is what the public sees when your link is shared. You can use the same image for both if desired.
Step 6: Review and finish
The Review page summarizes your channel before it's created:
• Features: what this channel does
• Layout: how viewers experience it
• Streaming: your video source and destinations
• Archive: what happens to recordings
• Social & sharing: sharing image, title and analytics
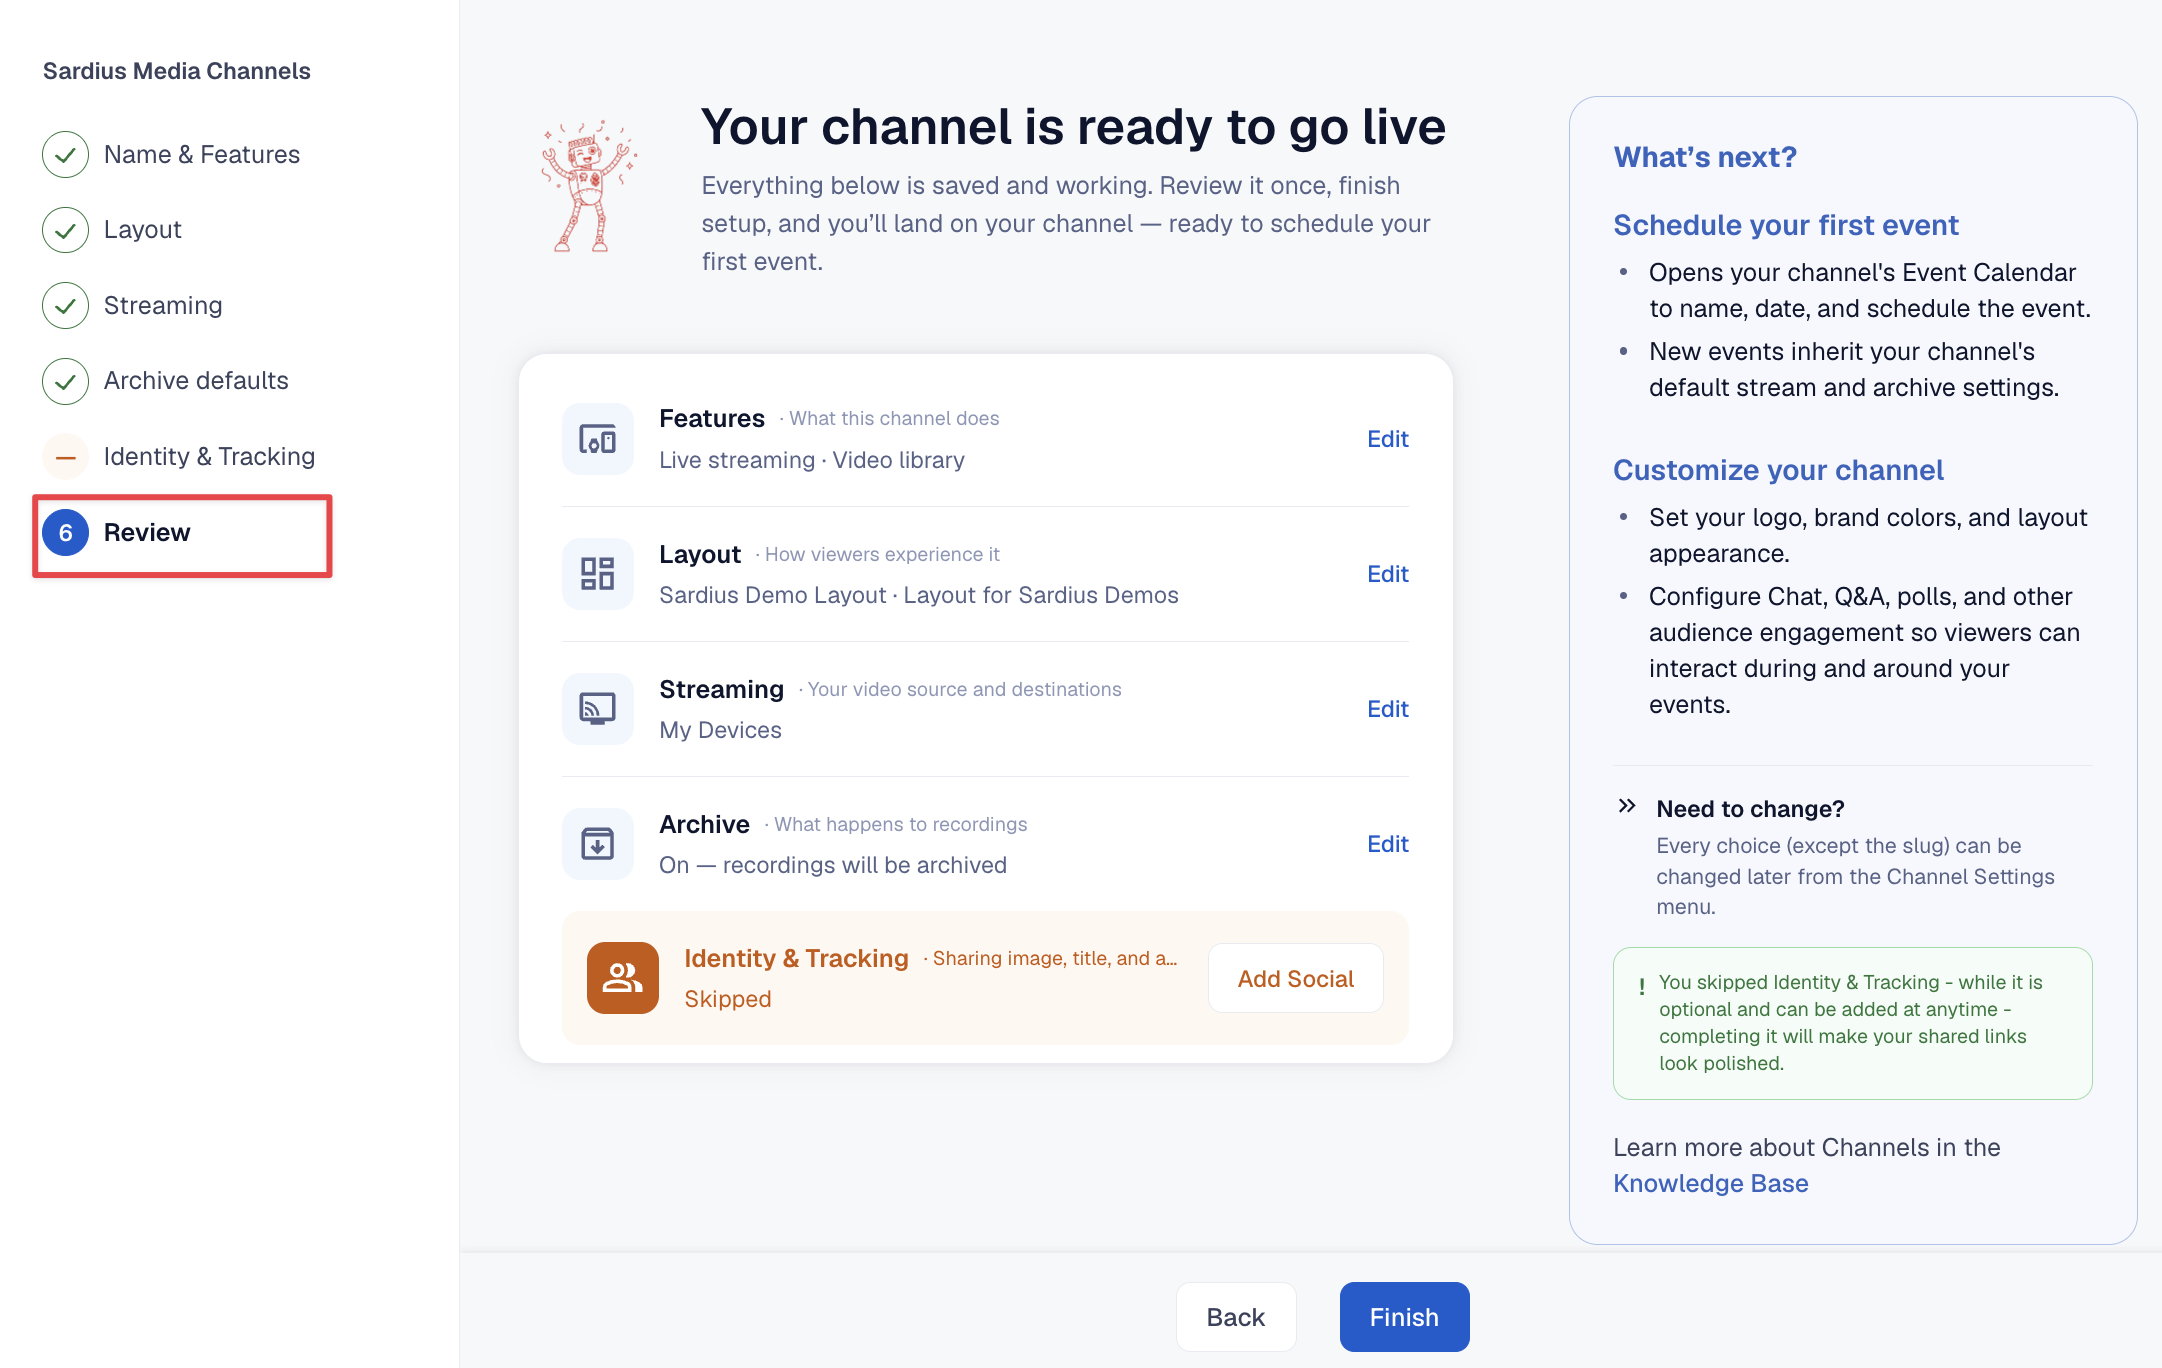
- Check each section. To change one, click Edit next to it. If you skipped Identity & Tracking, click Add Social to fill it in now.
- Click Finish.
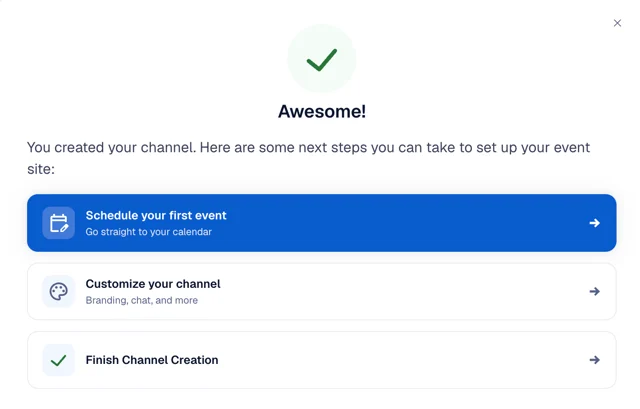
- In the confirmation window, you can choose what to do next:
◦ Schedule your first event: opens your channel's Event Calendar to name, date and schedule an event. New events inherit your channel's default stream and archive settings.
◦ Customize your channel: set your logo, brand colors, chat and other layout settings.
◦ Finish Channel Creation: goes back to your Channels list.
Need to change something later? Head to your Channel Settings menu.
Troubleshooting
• I can't continue past Step 1.
Make sure both Your channel's name and Channel URL are filled in. If they are, your URL is probably already used by another channel. This often happens when your channel name matches an existing channel's name. Edit the Channel URL field to something unique, and you'll be able to continue.
• My device, output or template isn't listed.
The setup guide only shows devices, outputs and templates already set up in your account, and only the ones that work with your chosen destination. Add them first, then return to Step 3.
See Add a Device and Adding an Output.
• I can't select a Default Media Profile.
Turn on Auto-archive and Auto-transcode first.
• My progress disappeared.
Refreshing the page, closing the setup pop-up, or using your browser's back button can clear your entries. You will need to start again from Create Channel.
• I don't see a feature or layout I expected.
Features and layouts depend on your plan. Contact Sales to learn about Premium features.
Still stuck? Email [support@sardius.media (mailto:support@sardius.media).